Arpeggios I – The CAGED-System
Arpeggios and the CAGED-System
As explained in the Introduction to Melody, the melodic application of a chord is called an arpeggio. The name is derived from the italian word for the harp.
Arpeggios can be played in two ways: First by fingering a chord and playing the notes successively instead of all at once. Unfortunately, this limits you to one note per string on the guitar and one note per finger on the piano, and it is hard to play coherent melodic material this way. The sort of repetitive 3 or four note patterns one gets this way, may be called an ostinato. While ostinatos themself are not strong melodies, they can be used instead of chords to provide a harmonic context and work wonders in support of melodies. The second way to play an arpeggio is playing more than one note per string or finger. This allows for a lot of freedom of expression and makes it easier to make directional lines, which means the melodic content will sound more coherent. For most intruments, this requires a fingering system.
Since we are now venturing into technique, I can no longer provide good advice for other instruments than guitar. I will now present a fingering system for guitar that is used in jazz, but can be applied to many styles and is perfect for getting to know the fretboard.
Here you can see what it would look like on the guitar:
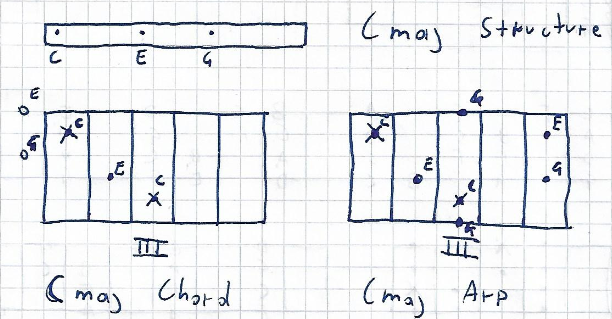
The arpeggio has more notes as the chord, but they are all octaves of notes in the chord, so we deal with the same notes.
Arpeggios are built the same way as chords and every chord has it’s arpeggiated form. Furthermore, whenever we play a melody, our brain will try to bring each note in a relationship with the chord being played at the moment, but at the same time also with the scale we are in. I have to emphasize once more, as I like to do, our brains are amazing.
For our fingering system we need to define the ranges of the fretboard in which we operate and the assignment of the fingers to the frets. As a basis for this, we’ll take the CAGED-System, which is a way to divide the guitar into five different moveable areas, each corresponding to one of the five open chord shapes.

Each melodic structure can be played in all of the CAGED-shapes and in any key. This sounds like a lot, but the neet thing about the guitar is, that every melodic structure looks the same in any key, which isn’t the case on instruments with different anatomy like the piano. Basically the guitar can be seen as five instruments in one. If a melodic structure has been mastered in all five shapes and the player is able to dynamically connect them, it can be considered mastered on the whole instrument. I will provide you with the basic Major Arpeggios and then elaborate on how more complex structures can be built from there. But first let’s define the rules to follow when it comes to fingering.
-
The shape provides the starting point and range of the arpeggio
-
The middle finger serves as anchor point
-
Stretches occur between the ring finger & pinky, and the middle & index
-
No stretches occur between middle & ring finger (except on very rare occasions)

The first shape is the C shape. Any note can be taken as the root. It is only called the C-shape because it looks like the chord that happens to be Open C in standard tuning. Whenever you’re in the C-shape, your pinky finger should be assigned to the root in the bass. Altough while playing we could and should start the arpeggio from any point while playing, we’ll think of the root in the bass as our starting point. All arpeggios span at least an octave. Depending on the shape, the octave will be found on different places. In the C-shape, the middle finger is assigned to the octave. This defines our range. The range is basically always defined by the placement of the middle finger. The ring finger is assigned to the fret between the pinky and middle finger. The index plays the notes below the middle finger. If there are any notes to be played above or below this 4-fret cluster, we apply rule number 3 to finger them. For the note below the root note you can use your ring finger. This may break the rule but it is faster and more fluent. Those kind of exceptions will pop up from time to time, but it is important to keep the broadly applicable rules in mind.
Here we go with the other shapes. You can use the markings on the pictograms to find out where to place which finger.

The A-shape. For this one, the index is assigned to the starting point. A stretch occurs between index and middle finger.

Then we have the G-shape. It could also be played with the pinky on the starting point and would actually be easier this way, but for some more advanced arpeggios the ring finger might be the better decision. It’s up to you.

Just like the A-shape the E-shape‘s starting point is the index finger. You have to skip the B string on that one.

Lastly, the D-shape. As the little brother of E and A, it’s starting point is also fingered with the index.
Now we have arpeggio fingerings assigned to each of the CAGED-shapes. This will allow us to play any major arpeggio pretty much anywhere on the fretboard. Awesome. Now, CAGED is also used for bigger melodic structures like scales and it is crucial to be able to associate arpeggios with those. But there is a catch – The shapes don’t match perfectly. This is where the two Hybrid shapes come into play.

The hybrid shapes have the middle finger as a starting point. The shape I showed on the very beginning was a hybrid shape. I forgot to draw the low fifth on the C&A Hybrid shape. Just like with the C-Shape, one may use the index finger for it to make it more fluent.
In order to really get those arpeggios under your fingers I’d recommend reading up on Systematical practice in the Circle of 4. It is also a good idea to associate those shapes with Pentatonic Patterns as fast as possible. In the next installation about arpeggios, we’ll look at how we can easily build other arpeggios out of the ones we know already.
u086uj
e2zceo
Hey there, I appreciate you posting great content covering that topic with full attention to details and providing updated data. I believe it is my turn to give back, check out my website QN5 for additional resources about Airport Transfer.
Bookmarked, so I can continuously check on new posts! If you need some details about Cosmetic Treatment, you might want to take a look at UQ5 Keep on posting!
This is top-notch! I wonder how much effort and time you have spent to come up with these informative posts. Should you be interested in generating more ideas about Thai-Massage, take a look at my website FQ4
whoah this blog is great i love reading your posts. Keep up the great work! You know, many people are hunting around for this info, you could aid them greatly.
Hey there! I just wanted to ask if you ever have any problems with hackers? My last blog (wordpress) was hacked and I ended up losing several weeks of hard work due to no backup. Do you have any solutions to protect against hackers?